---
title: How to Respond to a PPWR Packaging Data Request
description: Received a PPWR packaging data request from a customer in Simvia? Here's how to open it, build your packaging structure, and send your data step by step.
---
[Skip to content](https://helpcenter.simvia.com/knowledge-base/how-to-respond-to-a-ppwr-packaging-data-request#main-content)
English
Show submenu for translations
[](https://helpcenter.simvia.com/knowledge-base?hsLang=en)
Open main navigation
Close main navigation
- English
Show submenu for translations
This is a search field with an auto-suggest feature attached.
- There are no suggestions because the search field is empty.
1. [Help Center](https://helpcenter.simvia.com/knowledge-base?hsLang=en)
2. [PPWR](https://helpcenter.simvia.com/knowledge-base/ppwr?hsLang=en)
# How to Respond to a PPWR Packaging Data Request
Received a request from one of your customers to submit packaging data in Simvia? This article walks you through responding to it, from opening the request to signing and sending it.
Your customer needs this data to issue an EU Declaration of Conformity under the Packaging and Packaging Waste Regulation (PPWR), and that declaration is only as reliable as the data behind it. See **[Simvia's PPWR compliance solution page](https://www.simvia.com/ppwr-compliance-solution)** for background on what PPWR requires and why this data matters.
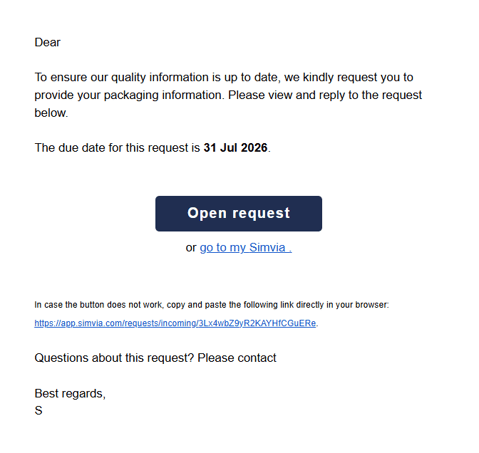
##### Here's what happens when a request comes in, and how to open it. Once you're in, we'll walk you through the rest of the steps below.
You'll receive an email notification when a customer requests packaging data from you. It shows the due date and a short message from the requester, with an Open request button that takes you straight to it. If the button doesn't work, the email also includes a direct link you can copy and paste into your browser.
****
You don't need an existing Simvia account to respond, the link opens the request directly. If you already have a free or pro Simvia account, you can also go to Simvia and open the request from there.
### 1. Open the request
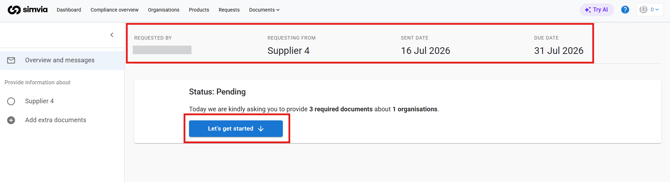
Once you're in, the overview page shows who requested the data, which company it's for, and when it's due.
Click **Let's get started** to begin. If anything is unclear before then, you can message the requester directly from this screen.
### 2. Check what's being asked for
Before you fill anything in, take a moment to see what's actually requested. The left-hand menu shows two things:
- Supplier information - your company name.
- Packaging data collection - the specific SKUs, packaging units, and components your customer needs data for (for example, a paper label, a corrugated shipper case, or a wooden pallet).
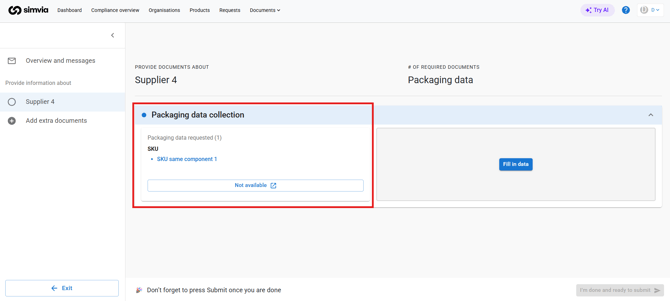
Keep in mind**:** the product hierarchy shown here may not be complete, there can be additional layers your customer knows about that aren't visible yet. Once you start filling in data, the full product hierarchy known to the requester will be displayed, and you may need to add products to it yourself if it's incomplete or unfamiliar to you.
Knowing the full scope upfront makes it easier to gather the right documents before you start typing.
### 3. Build the packaging structure
Map out how your packaging fits together across primary, secondary, and tertiary levels.
A PPWR packaging data request exists for one reason: your customer has to put together an EU Declaration of Conformity for the products they sell, and PPWR requires that declaration to rest on real, verifiable packaging data. You're the one who supplies the packaging, so you're the only one who can provide it.
What your customer needs from you isn't just a list of packaging components, it's how those components fit together. Under PPWR, packaging falls into three categories:
- **Sales packaging (primary)** - the packaging the consumer buys with the product, for example a jar, its lid, and its label.
- **Grouped packaging (secondary)** - packaging that groups several sales units together for restocking or shipping, for example a cardboard tray wrapped around four jars.
- **Transport packaging (tertiary)** - packaging used purely for handling and shipping, and removed before the product reaches the shelf, for example a shipper case, a pallet, or stretch wrap.
Each category is built up from one or more **packaging units**, and each unit is made up of **packaging components**, the individual jar, lid, or label, for instance. For every unit and component in the request, you'll complete a short series of forms with the specification your customer needs, more on that in step 4.
One more term you'll see throughout: **SKU**. It simply means the specific product being packaged, for example Strawberry Jam 340g. It's Simvia's shorthand for "what's being sold," not a term from the regulation itself.
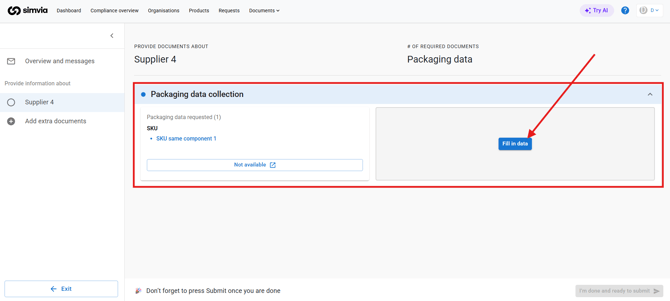
With that in mind, click **Fill in data** to open the component overview. This is where you map out how the packaging actually goes together: which components belong to which packaging unit, and which units belong to which product.
Components are grouped by packaging level - primary, secondary, and tertiary packaging - so you always know which part of the packaging system you're working on. Under PPWR, these are also known as Sales (primary), Grouped (secondary), and Transport (tertiary) packaging - so don't be thrown if you see either set of terms. If you're unsure how these levels map to your own packaging, see **[Understanding your packaging structure](https://helpcenter.simvia.com/knowledge-base/understanding-your-packaging-structure-sku-packaging-unit-packaging-component?hsLang=en)**.
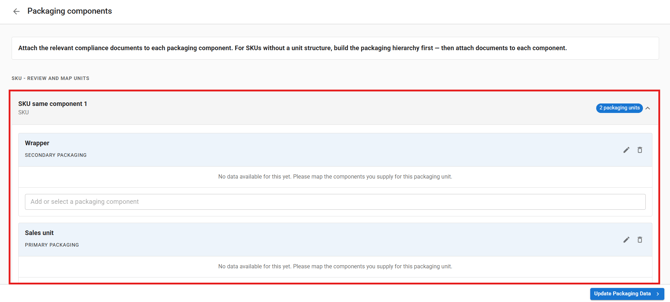
Below you'll see the packaging units for the **SKU same component 1**.
Below you'll see how to **add a packaging unit.**
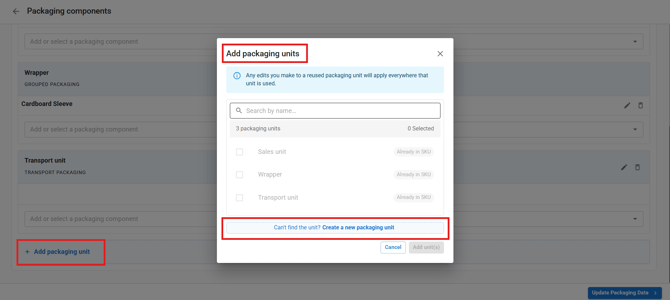
If you use the same unit across multiple items you supply (a crate, or a pallet plus wrap, for example), you can search for and pick that existing unit instead of rebuilding it.
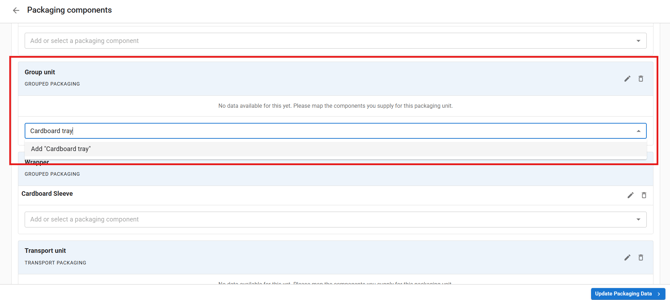
Below you'll see how to **add components** to the Secondary packaging.
****
A few things that make this step easier:
- Units can be reused: if the same physical unit (say, a shipper case or pallet) is used across several SKUs, pick it from your existing units instead of rebuilding it. Edit that unit once and the update applies to every SKU using it.
- Components work differently: when building the hierarchy, you can reuse components across the units you've created, to avoid duplicating packaging components.
- You can rename units and components you've created yourself, but not ones predefined by the requester.
- Removing a unit or component is permanent, so double-check before deleting - especially if other SKUs share that component.
Getting this structure right first means the data you enter next lands in the correct place.
### 4. Fill in the packaging component data
Once you open a component, you'll see a prompt to attach documents, letting Simvia's AI do the first pass for you before you start typing anything by hand.
#### **Let Simvia's AI pre-fill this for you**
Rather than typing every field in by hand, you can attach a document to the component and let Simvia's AI do the first pass for you.
**Here's how it works:**
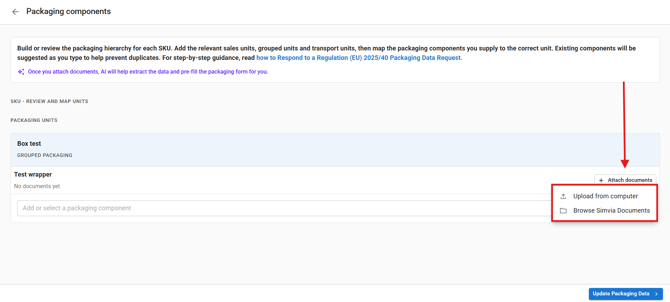
1. On a component, click Attach document.
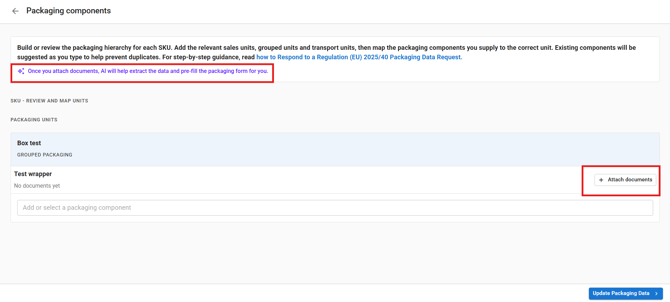
2. Choose Upload a file or Choose from my documents to link one already stored in Simvia.
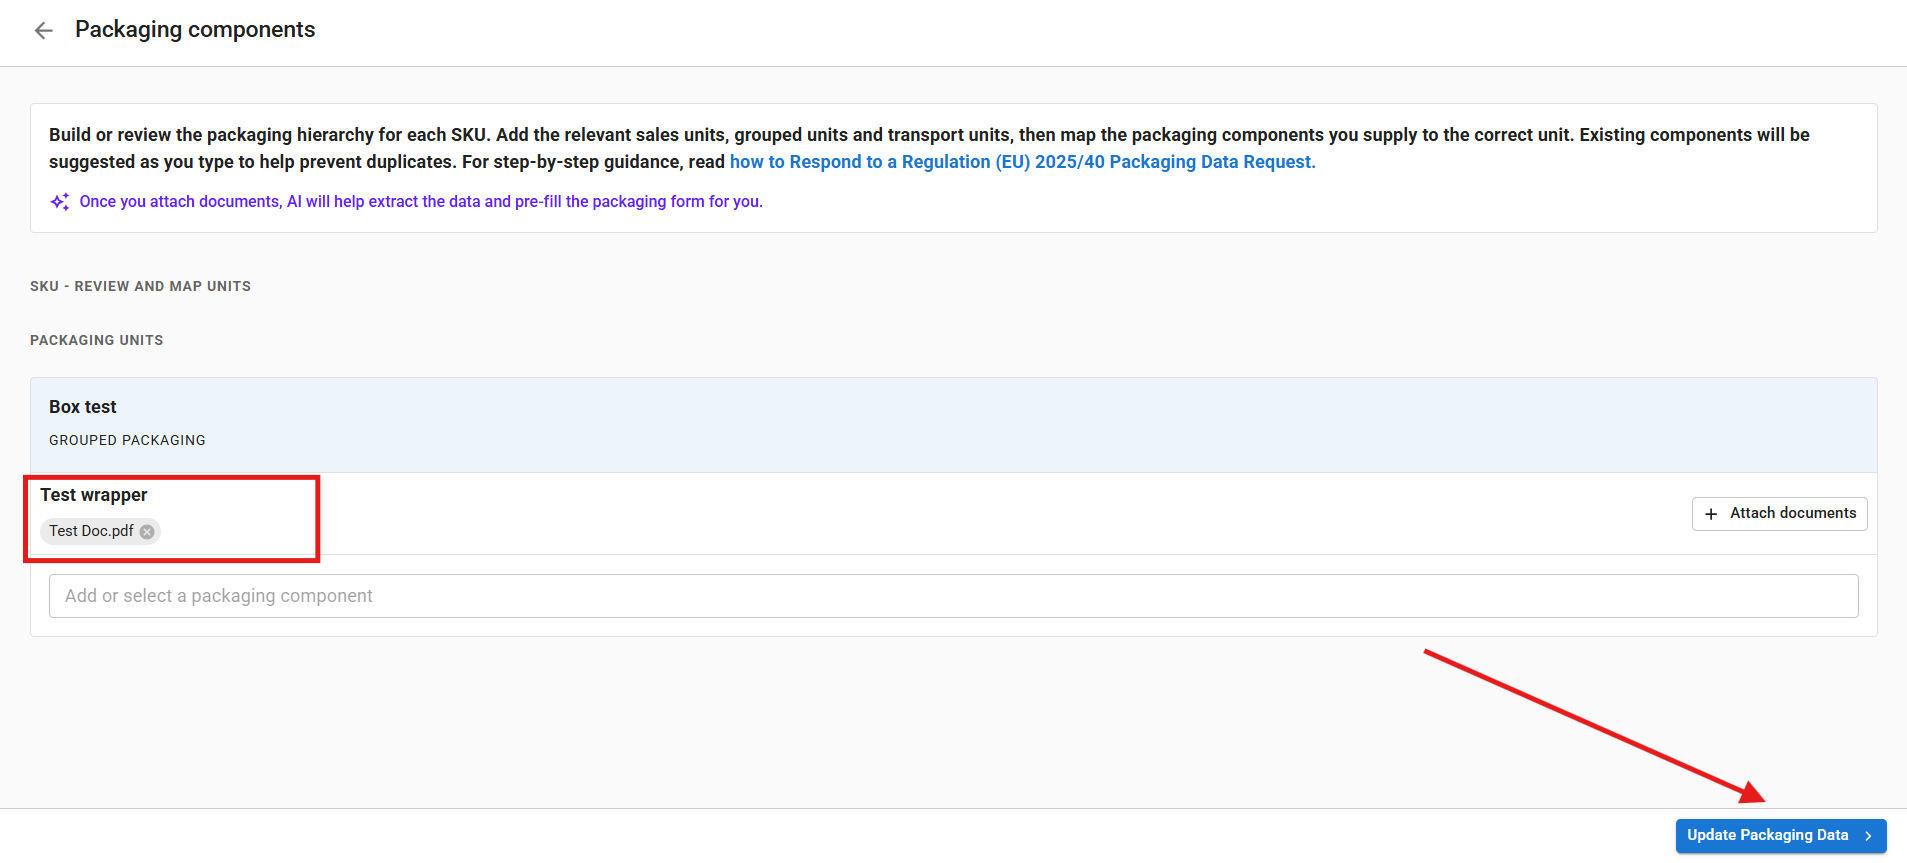
3. Click Update packaging data. This tells the AI to start working, it scans the document and pre-fills any fields it can confidently match, across any section of the component, not just the one you uploaded to.
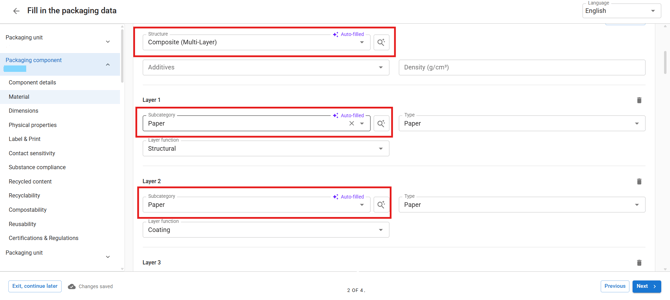
4. Each pre-filled field shows a label, so you can spot it at a glance and review it before moving on.
A few things worth knowing:
- The more relevant the document, a spec sheet or test certificate, for example, the more fields the AI is likely to fill in.
- You can attach more than one document to a component. Add all your documents before clicking Update packaging data, Simvia will remind you if you try to update before attaching everything.
- Pre-filled data is a starting point, not a final answer. Always check it against your own product specs before signing, since the AI can only work with what's in the document you gave it.
- You're free to overwrite any pre-filled field manually if it's incorrect or out of date.
#### Work through the remaining sections
Once the AI has done its pass, work through the sections in the left-hand menu: product name & identifiers, dimensions & size, material, physical properties, label & print, single-use plastic, recycled content, recyclability & sorting, food & product contact, substance compliance, and certifications & regulations. Some fields may already be filled in from the document you attached, review these alongside the ones still empty.
These sections map closely to what PPWR actually requires ahead of the August 2026 deadline, PFAS and heavy-metal testing, technical specifications, contact sensitivity, reusability, and material composition by layer.
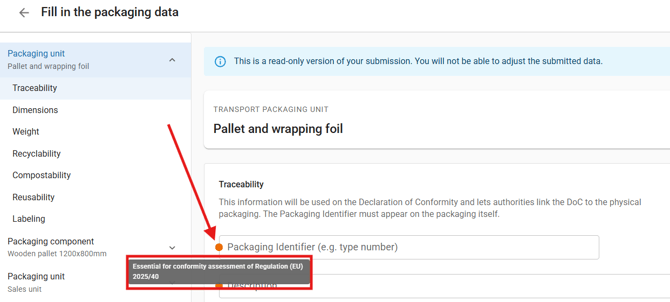
Fields marked with an orange dot are mandatory. Some of these are trigger questions, such as material type, food-contact packaging, and reusable, answering them decides what further fields appear. Hover over the dot to see why that field is required. For the specific fields and thresholds you'll need to fill in, see **[What to fill in by 12 August 2026](https://helpcenter.simvia.com/knowledge-base/ppwr-supplier-data-guide?hsLang=en)**.
#### **Some fields also ask for evidence directly**
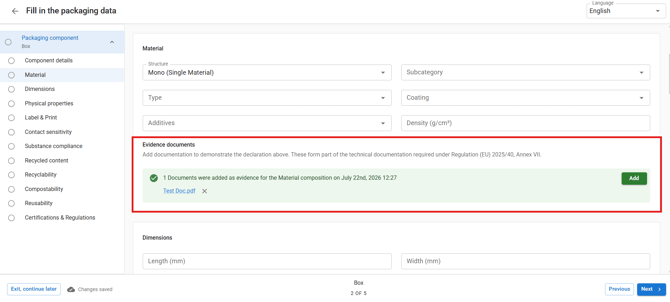
Separately from AI pre-fill, some individual fields, an SVHC declaration or a resin certificate, for example, come with their own Evidence documents section, where you attach the certificate that supports that specific answer. **This is for proof, not for pre-filling other fields.**
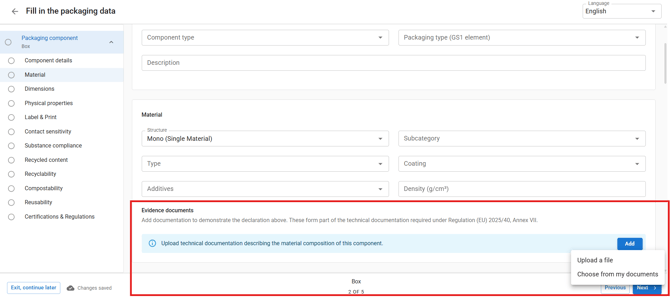
You'll find this in the same place, Add, then Upload a file or Choose from my documents. Once attached, the section turns green and shows the file name and date, confirming the upload went through.
A few tips for working through this step:
- Use the Next Component / Previous Component buttons at the bottom right of the page to move between components, you don't need to finish everything in one sitting.
- Accurate, real numbers and materials here are what makes the rest of the compliance chain reliable, so it's worth double-checking against your own product specs before submitting.
### **5. Sign and send**
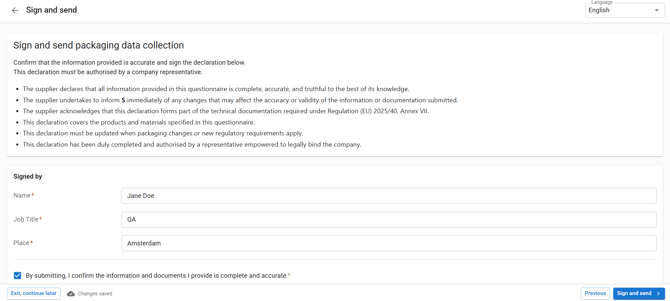
Once every component is complete (or marked as not available), review your answers and click **Sign and Send** to confirm the data is accurate.
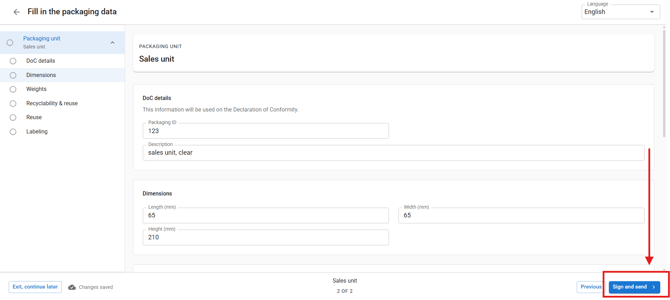
All components and SKUs in your request sit together in a single carousel, and you sign and send that carousel as one - there's no separate signing step per SKU.
### **6. After you send**
Once sent, your response moves into review with your customer. If everything is accepted, you're done - no further action needed on your end.
If you open a component and see a banner saying you've already signed and sent it, the form is locked for editing. If your customer needs a change, they'll request an update on that specific component (or the request as a whole), and it'll reopen for you to edit.
- [Getting Started](https://helpcenter.simvia.com/knowledge-base/getting-started?hsLang=en#main-content)
- [About Simvia](https://helpcenter.simvia.com/knowledge-base/getting-started?hsLang=en#about-simvia)
- [Navigating the Platform](https://helpcenter.simvia.com/knowledge-base/getting-started?hsLang=en#navigating-the-platform)
- [Account & Access](https://helpcenter.simvia.com/knowledge-base/getting-started?hsLang=en#account-access)
- [Supply Chain Approval (SCA)](https://helpcenter.simvia.com/knowledge-base/supply-chain-approval-sca?hsLang=en#main-content)
- [Dashboard](https://helpcenter.simvia.com/knowledge-base/supply-chain-approval-sca?hsLang=en#dashboard)
- [Compliance Overview](https://helpcenter.simvia.com/knowledge-base/supply-chain-approval-sca?hsLang=en#compliance-overview)
- [Organisations](https://helpcenter.simvia.com/knowledge-base/supply-chain-approval-sca?hsLang=en#organisations)
- [Products](https://helpcenter.simvia.com/knowledge-base/supply-chain-approval-sca?hsLang=en#products)
- [Requests](https://helpcenter.simvia.com/knowledge-base/supply-chain-approval-sca?hsLang=en#requests)
- [Documents](https://helpcenter.simvia.com/knowledge-base/supply-chain-approval-sca?hsLang=en#documents)
- [Requirements](https://helpcenter.simvia.com/knowledge-base/supply-chain-approval-sca?hsLang=en#requirements)
- [PPWR](https://helpcenter.simvia.com/knowledge-base/ppwr?hsLang=en)
- [Sustainability Risk Assessment (SRA)](https://helpcenter.simvia.com/knowledge-base/sustainability-risk-assessment-sra?hsLang=en)
- [Connections](https://helpcenter.simvia.com/knowledge-base/connections?hsLang=en#main-content)
- [Certification Databases](https://helpcenter.simvia.com/knowledge-base/connections?hsLang=en#certification-databases)
- [Laboratory Integrations](https://helpcenter.simvia.com/knowledge-base/connections?hsLang=en#laboratory-integrations)
- [Updates](https://helpcenter.simvia.com/knowledge-base/updates?hsLang=en#main-content)
- [Release Notes 2026](https://helpcenter.simvia.com/knowledge-base/updates?hsLang=en#release-notes-2026)
- [Release Notes 2025](https://helpcenter.simvia.com/knowledge-base/updates?hsLang=en#release-notes-2025)
[](https://www.simvia.com/)
Copyright © 2026, Simvia