---
title: What Happens When You Accept or Reject a Document
description: Learn what happens when you accept or reject a supplier document in Simvia — notifications, the Ask for Update email, New Request, and Set to Done explained.
---
[Skip to content](https://helpcenter.simvia.com/knowledge-base/what-happens-when-you-accept-or-reject-a-document#main-content)
English
Show submenu for translations
[](https://helpcenter.simvia.com/knowledge-base?hsLang=en)
Open main navigation
Close main navigation
- English
Show submenu for translations
This is a search field with an auto-suggest feature attached.
- There are no suggestions because the search field is empty.
1. [Help Center](https://helpcenter.simvia.com/knowledge-base?hsLang=en)
2. [Supply Chain Approval (SCA)](https://helpcenter.simvia.com/knowledge-base/supply-chain-approval-sca?hsLang=en)
3. [Requests](https://helpcenter.simvia.com/knowledge-base/supply-chain-approval-sca?hsLang=en#requests)
# What Happens When You Accept or Reject a Document
This article explains what happens when you accept, reject, ask for an update, or set a document request to done.
### Where to review a document
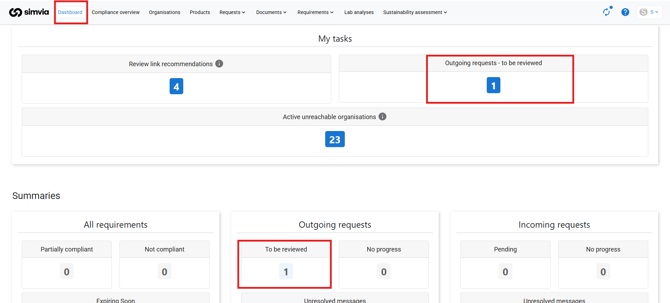
1. On your Simvia **Dashboard**, you can spot documents waiting on your review in two places : the **My tasks** widget at the top (**Outgoing requests – to be reviewed** tile) and the **Summaries** section further down (**Outgoing requests → To be reviewed** tile).
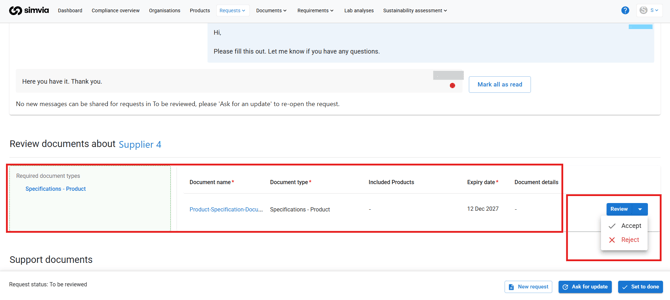
2. Click into a request **Ready to review** to open the **"Review documents about \[Supplier\]"** page.

3. Next to the document, click the **Review** button (the small arrow opens a dropdown) and choose **Accept** or **Reject**.
#### Accepting a document
When you click **Accept**, the document's status changes to **Accepted**. The expiry date field is empty until this point — during review, you can enter it manually, or let the AI read the document and fill it in for you. Once accepted, the expiry date shows in the overview.
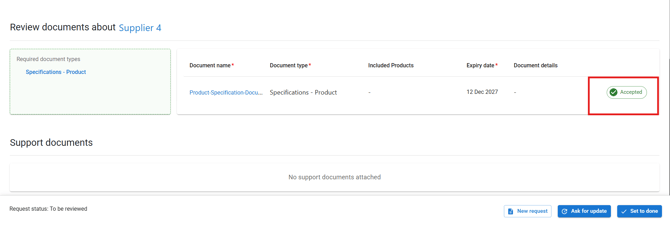
No automatic email is sent to the supplier. If the supplier has their own Simvia account, they'll simply see the updated status themselves next time they log in. From your side, there's nothing further to do — the requirement is compliant until the document's expiry date approaches.
#### Rejecting a document
When you click **Reject**, the document's status changes to **Rejected**.
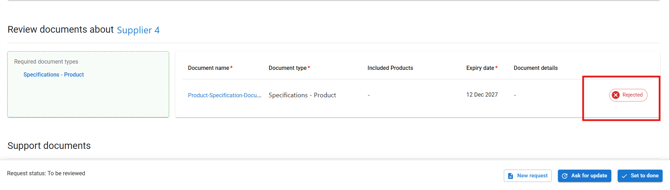
Here's the key thing to know: **the supplier is not automatically notified when you reject a document.** It's up to you to decide, and trigger, what happens next. Three buttons appear on the request page:
- **New Request** — creates a new request for the same document type, since the requirement is still not compliant after a rejection.
- **Ask for Update** — send the supplier a message and a new due date to resubmit the correct document.
- **Set to Done** — close the request; no further action is taken.
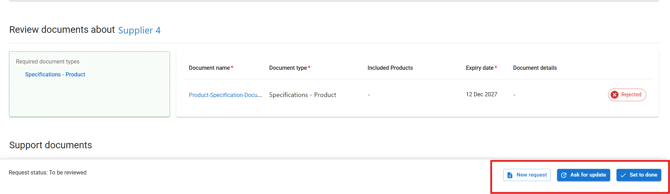
Note: while a request sits in **Ready to review**/**Rejected** status, no new messages can be exchanged with the supplier. Click **Ask for Update** to reopen the request if you need to message them.
##### Asking for an update
Click **Ask for Update** and a window opens where you can:
- Set a new due date for the supplier to respond by.
- Optionally add a message — this is a good place to explain *why* the document was rejected, so the supplier can fix it correctly the first time.
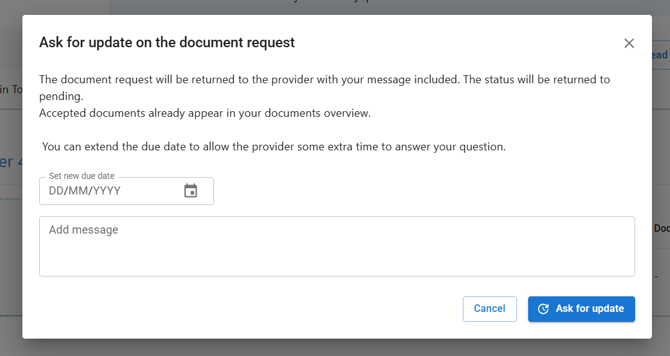
Once you confirm, the supplier receives an email with the subject line:
> **"\[Your Company Name\] is requesting updates for their open request(s)."**
This is currently the only point in the reject flow where the supplier is automatically notified by email.

*This is currently the only point in the reject flow where the supplier is automatically notified by email.*
**Setting a rejected request to Done**
Clicking **Set to Done** closes the request. The system then checks whether the requirement is compliant: if the document is still missing, it automatically sends a new request for it. Use **Set to Done** when you don't need to chase the supplier manually right now — the platform will follow up on the outstanding requirement for you.
##### Rejected by mistake? Here's the fix
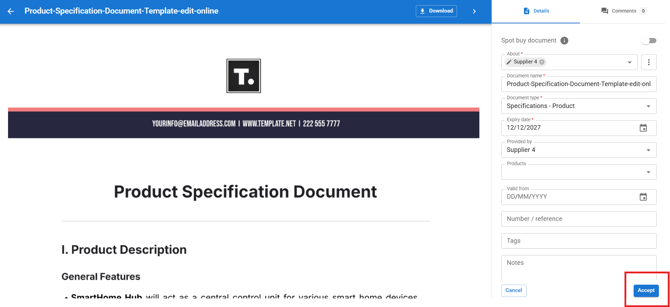
If you reject a document by accident, you don't need to start over. Open the document itself, scroll down in the details panel, and click **Accept**. This overwrites the rejection, and the document is marked **Accepted** — a handy safety net for those quick mis-clicks.
**Quick summary**
| Action | Supplier notified automatically? | What happens next |
| --- | --- | --- |
| **Accept** | No — they'll see the status update themselves if they have a Simvia account | Requirement is compliant until the document expires |
| **Reject** | No | You choose: New Request, Ask for Update, or Set to Done |
| **Ask for Update** | Yes — email sent with subject "\[Your Company\] is requesting updates for their open request(s)." | Supplier gets a new due date (and your message) to resubmit |
| **Set to Done** | No | Request is closed; if the requirement is still not compliant, the system automatically sends a new request |
Knowing exactly what each button triggers means you can review documents with confidence — and give suppliers clear, accurate answers about where things stand.
- [Getting Started](https://helpcenter.simvia.com/knowledge-base/getting-started?hsLang=en#main-content)
- [About Simvia](https://helpcenter.simvia.com/knowledge-base/getting-started?hsLang=en#about-simvia)
- [Navigating the Platform](https://helpcenter.simvia.com/knowledge-base/getting-started?hsLang=en#navigating-the-platform)
- [Account & Access](https://helpcenter.simvia.com/knowledge-base/getting-started?hsLang=en#account-access)
- [Supply Chain Approval (SCA)](https://helpcenter.simvia.com/knowledge-base/supply-chain-approval-sca?hsLang=en#main-content)
- [Dashboard](https://helpcenter.simvia.com/knowledge-base/supply-chain-approval-sca?hsLang=en#dashboard)
- [Compliance Overview](https://helpcenter.simvia.com/knowledge-base/supply-chain-approval-sca?hsLang=en#compliance-overview)
- [Organisations](https://helpcenter.simvia.com/knowledge-base/supply-chain-approval-sca?hsLang=en#organisations)
- [Products](https://helpcenter.simvia.com/knowledge-base/supply-chain-approval-sca?hsLang=en#products)
- [Requests](https://helpcenter.simvia.com/knowledge-base/supply-chain-approval-sca?hsLang=en#requests)
- [Documents](https://helpcenter.simvia.com/knowledge-base/supply-chain-approval-sca?hsLang=en#documents)
- [Requirements](https://helpcenter.simvia.com/knowledge-base/supply-chain-approval-sca?hsLang=en#requirements)
- [PPWR](https://helpcenter.simvia.com/knowledge-base/ppwr?hsLang=en)
- [Sustainability Risk Assessment (SRA)](https://helpcenter.simvia.com/knowledge-base/sustainability-risk-assessment-sra?hsLang=en)
- [Connections](https://helpcenter.simvia.com/knowledge-base/connections?hsLang=en#main-content)
- [Certification Databases](https://helpcenter.simvia.com/knowledge-base/connections?hsLang=en#certification-databases)
- [Laboratory Integrations](https://helpcenter.simvia.com/knowledge-base/connections?hsLang=en#laboratory-integrations)
- [Updates](https://helpcenter.simvia.com/knowledge-base/updates?hsLang=en#main-content)
- [Release Notes 2026](https://helpcenter.simvia.com/knowledge-base/updates?hsLang=en#release-notes-2026)
- [Release Notes 2025](https://helpcenter.simvia.com/knowledge-base/updates?hsLang=en#release-notes-2025)
[](https://www.simvia.com/)
Copyright © 2026, Simvia